|
|
|
DIY
CAI
(or Do-it-yourself Cold Air
Intake)
If you are here then you probably have heard of the gains that are possible by getting rid of that restrictive stock intake and adding an AEM unit instead. When I first saw the $230 AEM price tag I about fell over. I wondered how anyone could spend that much on some tubing, a filter, some clamps and a sticker. But, if you are a cheap bastard (like me) and have the tools and skill you can make your own. So here is how I made mine.
Before you go any farther. I am
not responsible for anything that goes wrong with your car or this
installation. Take your time, think things through and use common sense.
Perform this modification at your own risk.
Materials:
|
1 - 180º bend 2.5” mandrel bent aluminized steel tubing |
JCWhitney |
81zx3035n |
$23.00 |
|
3 – 2” rubber sleeves with clamps (they will stretch) |
Lowe’s |
|
$4.00 ea |
|
1 – Conical Air filter |
Auto Parts Store |
|
$20.00 |
|
1 – AN fitting (for crank case vent) |
Auto Parts Store |
|
$2.00 |
|
1 – 12” length of rubber hose |
Auto Parts Store |
|
<$1.00 |
|
2 – small hose clamps |
Auto Parts Store |
|
$1.00 |
|
1 – Barstock |
Lowes |
|
$1.00 |
|
1 – can High Temp Paint |
Auto Parts Store |
|
<$4.00 |
Total: $54.00
Tools:
Screwdriver
Hacksaw
Drill
Welder (optional)
![]() The first step in making the intake is to wash
the tubing. Mine was covered in manufacturing oil and filthy
The first step in making the intake is to wash
the tubing. Mine was covered in manufacturing oil and filthy
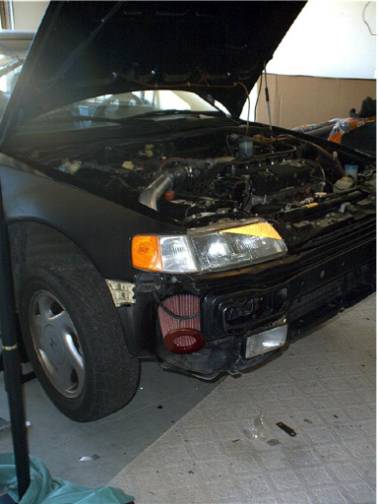
![]() Remove the stock intake assembly and front
bumper
Remove the stock intake assembly and front
bumper
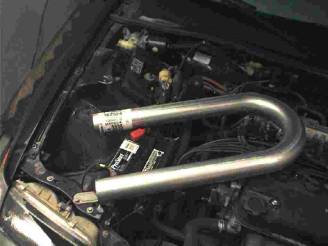
![]() Lay the pipe in the engine bay to get an idea of
how you will cut the tube to best fit your car. I started at the throttle body
and worked my way down.
Lay the pipe in the engine bay to get an idea of
how you will cut the tube to best fit your car. I started at the throttle body
and worked my way down.
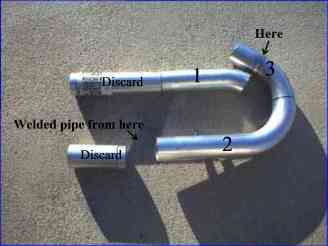
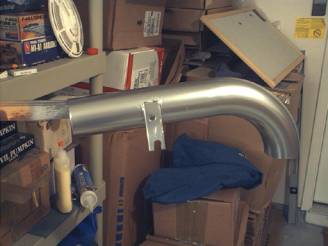
![]() In the tools list I said the welder was
optional. In the places where I’ve welded the pipe you can just use hose
clamps. I welded mine to reduce the number of clamps I would need, for a
cleaner look and to make the unit more rigid. In the above pic you can see
where I welded pipes together. I also ended up welding the two upper pipes
(1&2) together later on because it would flex too much and come loose.
In the tools list I said the welder was
optional. In the places where I’ve welded the pipe you can just use hose
clamps. I welded mine to reduce the number of clamps I would need, for a
cleaner look and to make the unit more rigid. In the above pic you can see
where I welded pipes together. I also ended up welding the two upper pipes
(1&2) together later on because it would flex too much and come loose.
![]() Now that you have all the pieces cut out and
deburred you need to install the AN fitting. This is a very important step.
Without this fitting and the hose installed the car will not run. If you look
in the pics you will not see on mine. That is because I installed mine on the
backside… don’t ask why. I drilled a hole, used a tap to put threads in the
tube, screwed in the AN fitting and sealed it with JB Weld. You don’t want any
air leaks.
Now that you have all the pieces cut out and
deburred you need to install the AN fitting. This is a very important step.
Without this fitting and the hose installed the car will not run. If you look
in the pics you will not see on mine. That is because I installed mine on the
backside… don’t ask why. I drilled a hole, used a tap to put threads in the
tube, screwed in the AN fitting and sealed it with JB Weld. You don’t want any
air leaks.
![]() Next, you need to make a support bracket. I
found some barstock at Lowes and welded it to tube #2. The slotted end fits
onto the screw that held on the stock air box.
Next, you need to make a support bracket. I
found some barstock at Lowes and welded it to tube #2. The slotted end fits
onto the screw that held on the stock air box.
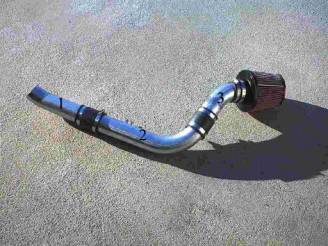
![]() Painting. I originally chose Silver 1200º
paint. If you use this paint you must bake it in the oven to fully harden and
cure it, otherwise; it will rub off and make a mess… once again, don’t ask. I
later decided I liked the red 500º paint better anyway.
Painting. I originally chose Silver 1200º
paint. If you use this paint you must bake it in the oven to fully harden and
cure it, otherwise; it will rub off and make a mess… once again, don’t ask. I
later decided I liked the red 500º paint better anyway.
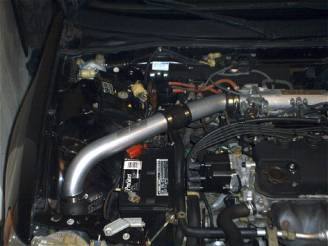
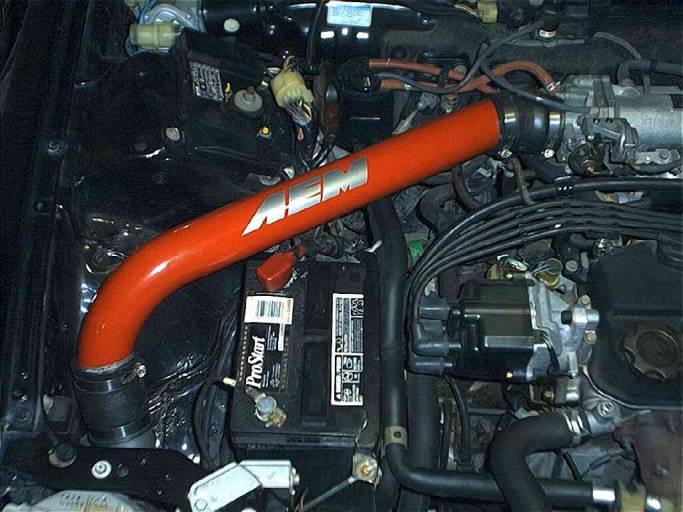
![]() Here is the final product in the car.
Here is the final product in the car.
![]() Finally, put the bumper back on and go for a
drive!
Finally, put the bumper back on and go for a
drive!
![]() The first thing I noticed was the sound. The
car definitely has a more aggressive growl, especially at higher RPMs. I
haven’t dyno tested it yet but it sure feels stronger all the way up until
redline.
The first thing I noticed was the sound. The
car definitely has a more aggressive growl, especially at higher RPMs. I
haven’t dyno tested it yet but it sure feels stronger all the way up until
redline.
![]() Water Ingestion. I live in Florida and I’ve
had this setup installed for about a 6 months. I’ve driven through puddles that
are 4”-6” deep and hard rainfall. I haven’t had any problems.
Water Ingestion. I live in Florida and I’ve
had this setup installed for about a 6 months. I’ve driven through puddles that
are 4”-6” deep and hard rainfall. I haven’t had any problems.
![]() For a look at another CAI project check out
this link at teamsolcal.com.
It’s on a Del Sol but the info is great.
For a look at another CAI project check out
this link at teamsolcal.com.
It’s on a Del Sol but the info is great.
Update: I welded the two upper pipes together so the system now has only 2 pipes and I painted it red. I also got the sticker from my brother